Spring Boot AWS S3 PresignedUrl 으로 파일 업로드 다운로드 하기(Kotlin)

이번 글을 통해 배워 갈 내용
- Spring Boot AWS S3 Setting
- Spring Boot AWS S3 PresignedUrl으로 파일 업로드하는 방법 (PUT)
- Spring Boot AWS S3 PresignedUrl 으로 파일 다운로드하는 방법 (GET)
서론
회사에서 매일 Azure SAS Key를 가지고 Blob을 다루다가
이번에 AWS 스터디를 혼자하면서
AWS에서도 Azure 처럼 URL 받아서
클라이언트 서버에서 직접 파일을 업로드하고 다운로드하는 방법을 연구하였습니다.
kotlin으로 구현하였으나 로직은 동일해서 자바로 개발하시는 분들도 쉽게 보시리라 믿습니다.
구현 계획
1.
클라이언트 서버 (리액트) -> 리소스 겸 인증 서버 (스프링)에 PresignedUrl을 요청한 뒤 받아서
2.
클라이언트 서버 (리액트) -> AWS S3 서버에 직접 파일을 올립니다.
3
다운로드도 동일한 방법으로 진행됩니다.
구현
1. build.gradle.kts
먼저
Gradle 기준으로 build.gradle.kts 파일에 aws java sdk를 설치합니다.
implementation("com.amazonaws:aws-java-sdk:1.12.325")
메이븐의 POM파일이나 이나 Groovy 기반 gradle은 아래 링크에서 형식을 다운로드하시면 됩니다.
https://mvnrepository.com/artifact/com.amazonaws/aws-java-sdk
2. application.properties
application.properties 파일을 업데이트해줍니다.
보안을 위해서 제 정보는 한글로 변경했습니다.
cloud.aws.stack.auto=false
cloud.aws.region.static= 위치
cloud.aws.credentials.access-key= 액세스 키
cloud.aws.credentials.secret-key= 비밀 키
cloud.aws.s3.bucket=https://S3명칭.s3.위치.amazonaws.com
cloud.aws.s3.name=S3명칭
3. S3Config.kts
위에서 설정한 정보를 불러오는 Configuration 파일을 만듭니다.
import com.amazonaws.auth.AWSStaticCredentialsProvider
import com.amazonaws.auth.BasicAWSCredentials
import com.amazonaws.services.s3.AmazonS3Client
import com.amazonaws.services.s3.AmazonS3ClientBuilder
import org.springframework.beans.factory.annotation.Value
import org.springframework.context.annotation.Bean
import org.springframework.context.annotation.Configuration


@Configuration
class S3Config {
    @Value("\${cloud.aws.credentials.access-key}")
    private val accessKey: String? = null

    @Value("\${cloud.aws.credentials.secret-key}")
    private val secretKey: String? = null

    @Value("\${cloud.aws.region.static}")
    private val region: String? = null

    @Bean
    fun amazonS3Client(): AmazonS3Client {
        val awsCredentials = BasicAWSCredentials(accessKey, secretKey)
        return AmazonS3ClientBuilder.standard()
            .withRegion(region)
            .withCredentials(AWSStaticCredentialsProvider(awsCredentials))
            .build() as AmazonS3Client
    }
}
4. S3FileManager.kts
aws presignedurl을 불러오는 컴포넌트를 만듭니다.
URL을 액세스 하는 시간은 1일로 설정하였습니다.
import com.amazonaws.HttpMethod
import com.amazonaws.services.s3.AmazonS3
import org.springframework.beans.factory.annotation.Value
import org.springframework.scheduling.annotation.Async
import org.springframework.stereotype.Component
import java.util.*

@Component
class S3FileManager(val amazonS3 : AmazonS3) {

    @Value("\${cloud.aws.s3.name}")
    private val s3BucketName: String? = null

    private fun generateUrl(fileName: String, httpMethod: HttpMethod): String {
        val calendar: Calendar = Calendar.getInstance()
        calendar.time = Date()
        calendar.add(Calendar.DATE, 1) // ACCESS 기간은 하루
        return amazonS3.generatePresignedUrl(s3BucketName, fileName, calendar.time, httpMethod).toString()
    }

    @Async
    fun getFileDownloadUrl(fileName: String): String? {
        if (!amazonS3.doesObjectExist(s3BucketName, fileName)) return "파일이 존재하지 않습니다."
        return generateUrl(fileName, HttpMethod.GET)
    }

    @Async
    fun postFileUploadUrl(extension: String): String? {
        val fileName: String = UUID.randomUUID().toString() + extension
        if (amazonS3.doesObjectExist(s3BucketName, fileName)) return "파일이 존재합니다."
        return generateUrl(fileName, HttpMethod.PUT)
    }
}
5.
테스트를 위해 컨트롤러를 만듭니다.
import org.springframework.http.HttpStatus
import org.springframework.http.ResponseEntity
import org.springframework.web.bind.annotation.*


@RestController
@RequestMapping("/api/test")
class Test (val s3FM : S3FileManager){

    @PostMapping
    fun postFileUploadUrl(@RequestParam("extension") extension: String): ResponseEntity<Any?>? {
        // extension = .jpg, .png
        return ResponseEntity(s3FM.postFileUploadUrl(extension), HttpStatus.OK)
    }

    @GetMapping
    fun getFileDownloadUrl(@RequestParam("name") fileName: String): ResponseEntity<Any?>? {
        return ResponseEntity(s3FM.getFileDownloadUrl(fileName), HttpStatus.OK)
    }
}
6. 테스트를 해봅니다.
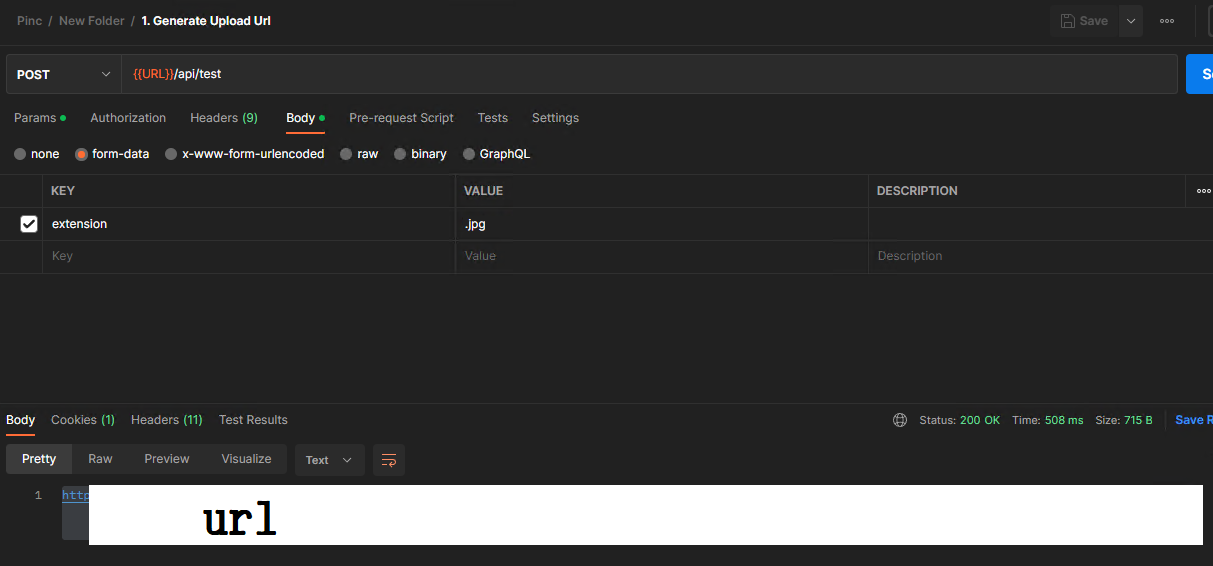
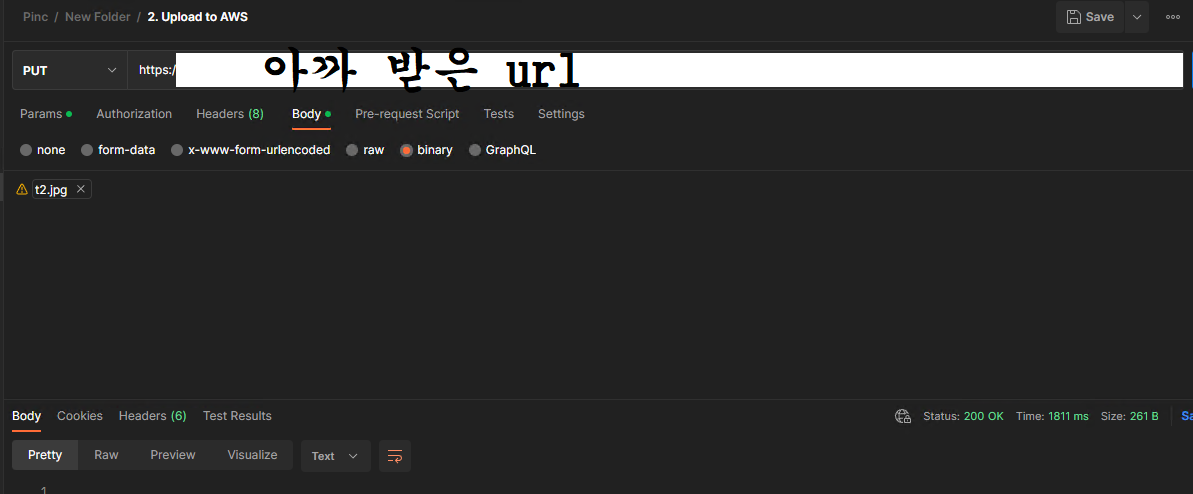

파일이 잘 올라간 것을 확인하였습니다.
참조 및 인용
https://github.com/awsdocs/aws-doc-sdk-examples/tree/main/javav2/example_code/s3#readme
GitHub - awsdocs/aws-doc-sdk-examples: Welcome to the AWS Code Examples Repository. This repo contains code examples used in th
Welcome to the AWS Code Examples Repository. This repo contains code examples used in the AWS documentation, AWS SDK Developer Guides, and more. For more information, see the Readme.md file below....
github.com
블로그 추천 포스트
https://codemasterkimc.tistory.com/50
300년차 개발자의 좋은 코드 5계명 (Clean Code)
이번 글을 통해 배워갈 내용 좋은 코드(Clean Code)를 작성하기 위해 개발자로서 생각해볼 5가지 요소를 알아보겠습니다. 개요 좋은 코드란 무엇일까요? 저는 자원이 한정적인 컴퓨터 세상에서 좋
codemasterkimc.tistory.com
오늘도 즐거운 코딩 하시길 바랍니다 ~ :)