Spring 초간단 Custom ORM을 만들며 배운 한가지

이번 글을 통해 배워 갈 내용
- ORM 정의
- JPA 정의
- ORM 만들어보기 실습
- ORM 정의
Object Relational Mapping의 약자로서
객체 관계 맵핑을 해주고 객체 모델과 관계형 모델의 불일치를 해결하는데 도움을 줍니다.
객체를 테이블에 영속화하는데 도움을 주는 기능이라 보시면 됩니다.
- JPA 정의
Java Persistence API는 자바에서 주로 쓰는 ORM 기술표준입니다.
- ORM 만들어보기
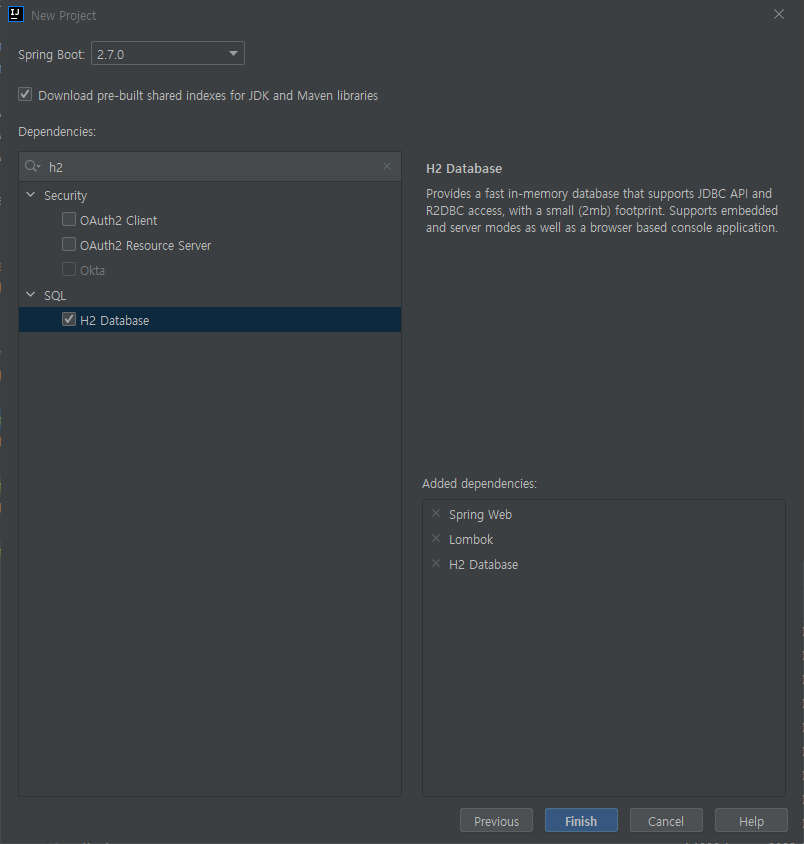
먼저 Spring boot 프로젝트를 만들어줍니다.
(쌩 JAVA 프로젝트로 하셔도 무방하나 편의를 위해서 Spring을 사용하였습니다)

Dependency로는 편의를 위해서 Spring Web, Lombok 그리고 h2 인메모리 DB를 추가했습니다.
h2 in memory db를 사용하기 위해서
Maven 기준으로 POM 파일에 spring-boot-starter-jdbc을 추가해주고
<dependency>
    <groupId>org.springframework.boot</groupId>
    <artifactId>spring-boot-starter-jdbc</artifactId>
</dependency>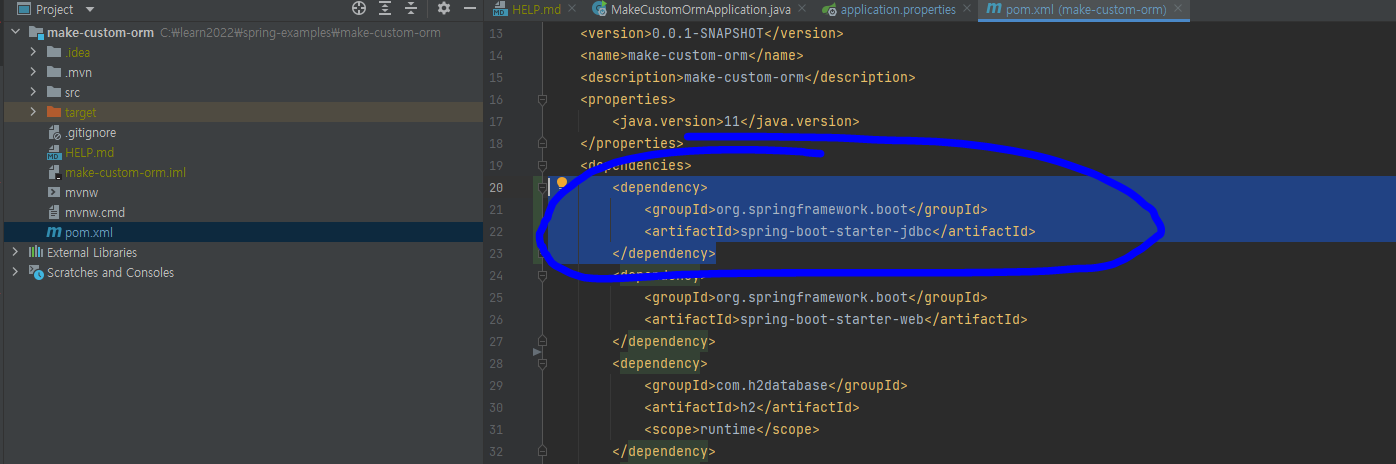
application.properties 파일에 h2 설정을 추가해줍니다.
spring.h2.console.enabled=true
spring.datasource.url=jdbc:h2:mem:testdb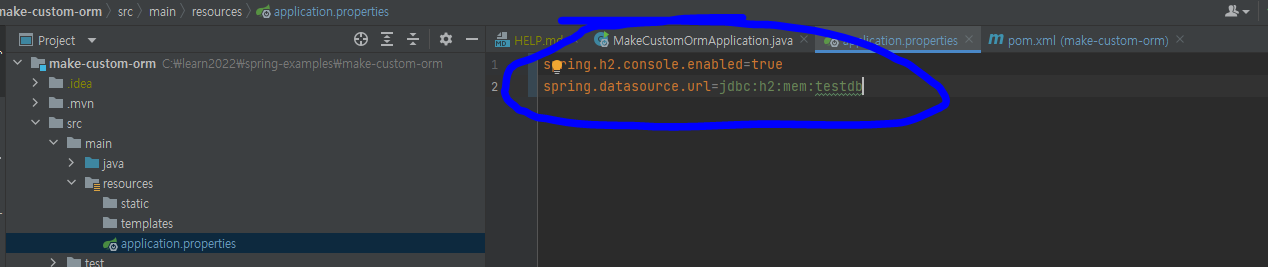
프로젝트 실행 후
http://localhost:8080/h2-console 을 방문해주셔서
아래와 같이 Test Connection 클릭시
Test successful이 나오면 다음 단계로 진행해주시고
(Fail 문구가 나온다면 에러 문구를 구글링 하시거나 아래 댓글을 남겨주세요)

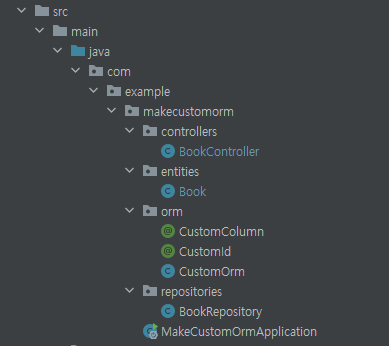
디렉터리 구조는 다음과 같습니다.
자 이제 Custom ORM을 호출하는 Controller를 만들겠습니다.
GET /books를 입력으로 받으면 책 리스트를 조회하고
POST /books 를 입력으로 json 값과 함께 받으면 책을 등록합니다
package com.example.makecustomorm.controllers;

import com.example.makecustomorm.entities.Book;
import com.example.makecustomorm.repositories.BookRepository;
import org.springframework.web.bind.annotation.*;

import java.util.List;

@RestController
@RequestMapping("/books")
public class BookController {

    BookRepository bookRepository;

    public BookController(BookRepository bookRepository) {
        this.bookRepository = bookRepository;
    }

    @GetMapping(value = "")
    public List<Book> findBooks() {
        return bookRepository.read();

    }

    @PostMapping(value = "")
    public boolean createBooks(@RequestBody Book book) {
        return bookRepository.create(book);
    }

}
원래는 실무에서 Request 객체, Response 객체나 DTO를 사용해서 Entity 변환을 해주는데
시간 관계상 Book Entity를 DTO 없이 사용합니다.
id, category, isbn, title을 사용하며
@Getter와 @Setter는 롬복에서 Getter Setter 생성해주는 것이고
@CustomId와 @CustomColumn은 커스텀 ORM을 위해서 제가 만든 것입니다.
package com.example.makecustomorm.entities;

import com.example.makecustomorm.orm.CustomColumn;
import com.example.makecustomorm.orm.CustomId;
import lombok.Getter;
import lombok.Setter;

@Getter
@Setter
public class Book {

    @CustomId
    long id;

    @CustomColumn
    String category;

    @CustomColumn
    String isbn;

    @CustomColumn
    String title;

    public Book(long id, String category, String isbn, String title) {
        this.id = id;
        this.category = category;
        this.isbn = isbn;
        this.title = title;
    }

    public Book() {
    }
}
Runtime에 사용되고
Field에 영향을 주는
Annotation 들입니다
package com.example.makecustomorm.orm;

import java.lang.annotation.ElementType;
import java.lang.annotation.Retention;
import java.lang.annotation.RetentionPolicy;
import java.lang.annotation.Target;

@Retention(RetentionPolicy.RUNTIME)
@Target(ElementType.FIELD)
public @interface CustomColumn {
}
import java.lang.annotation.ElementType;
import java.lang.annotation.Retention;
import java.lang.annotation.RetentionPolicy;
import java.lang.annotation.Target;

@Retention(RetentionPolicy.RUNTIME)
@Target(ElementType.FIELD)
public @interface CustomId {
}
책을 열고 생성하고 DB와 연결해주는 Repository입니다.
import com.example.makecustomorm.entities.Book;
import com.example.makecustomorm.orm.CustomOrm;
import org.springframework.stereotype.Repository;

import java.util.List;

@Repository
public class BookRepository {
    CustomOrm<Book> customOrm = CustomOrm.connect();

    public List<Book> read() {
        return customOrm.read(Book.class);
    }

    public boolean create(Book book) {
        return customOrm.create(book);
    }
}
DB 연결을 해주고
최초 연결 시
createBookTable()을 사용해서 책 테이블을 만들어줍니다.
추후 시간이 된다면 이 부분도 Annotation 기반으로 만들 수 있겠지만
시간 관계상
책을 조회하고 생성하는 부분만 Custom 하게 만들어보겠습니다.
List<T> read(Class<T> clss)boolean create(T t)의 경우 Annotation을 활용해서
INSERT INTO Book (category, isbn, title) VALUES ('romance', '1', '1번 책');
SELECT * FROM BOOK;
과 같은 Query 문을 클래스 타입과 Custom Column에 맞게 생성해주고
DB를 Query 합니다.
사실 이 부분이 핵심입니다.
JDBC를 사용하였으며
항상 그렇듯
JDBC Driver 등록-> DB 연결 생성 -> Query 실행 -> 그리고 필요시 리턴 값을 받습니다.
package com.example.makecustomorm.orm;

import java.lang.reflect.Field;
import java.sql.*;
import java.util.ArrayList;
import java.util.Arrays;
import java.util.List;

public class CustomOrm<T> {

    // 정보는 최소한 application properties 에서 불러와야함
    // 편의를 위해서 아래와 같이 비밀번호 아이디를 처리함
    static final String JDBC_DRIVER = "org.h2.Driver";
    static final String DB_URL = "jdbc:h2:mem:testdb";
    static final String DB_ID = "sa";
    static final String DB_PWD = "";


    public static <T> CustomOrm<T> connect() {
        createBookTable();
        return new CustomOrm<>();
    }

    // todo annotation 기반으로 바꿔보기
    private static void createBookTable() {
        Connection connection = null;
        Statement statement = null;
        try {
            // JDBC Driver 등록
            Class.forName(JDBC_DRIVER);

            // DB 연결 생성
            connection = DriverManager.getConnection(DB_URL, DB_ID, DB_PWD);

            // Query 실행
            statement = connection.createStatement();
            String sql = "CREATE TABLE   Book " +
                    "(id INTEGER not NULL AUTO_INCREMENT, " +
                    " category NVARCHAR(255), " +
                    " title NVARCHAR(255), " +
                    " isbn NVARCHAR(255), " +
                    " PRIMARY KEY ( id ))";
            statement.executeUpdate(sql);

            // 연결 종료
            statement.close();
            connection.close();
        } catch (Exception e) {
            // error handling
            e.printStackTrace();
        } finally {
            // 자원 반환
            try {
                if (statement != null) statement.close();
            } catch (SQLException e) {
                e.printStackTrace();
            }
            try {
                if (connection != null) connection.close();
            } catch (SQLException e) {
                e.printStackTrace();
            }
        }
    }

    public List<T> read(Class<T> clss) {
        Field[] declaredFields = clss.getDeclaredFields();
        List<T> retList = new ArrayList<>();

        Connection connection = null;
        Statement statement = null;
        try {
            // JDBC Driver 등록
            Class.forName(JDBC_DRIVER);

            // DB 연결 생성
            connection = DriverManager.getConnection(DB_URL, DB_ID, DB_PWD);

            // Query 실행
            statement = connection.createStatement();
            String sql = "SELECT * FROM " + clss.getSimpleName() + ";";
            ResultSet rs = statement.executeQuery(sql);

            while (rs.next()) {
                // 입력받은 제너릭 클래스 생성
                T t = clss.getConstructor().newInstance();
                // Retrieve by column name
                Arrays.stream(declaredFields).forEach(field -> {
                            try {
                                if (field.isAnnotationPresent(CustomColumn.class)) {
                                    field.setAccessible(true);
                                    if (field.getType() == int.class) {
                                        field.set(t, rs.getInt(field.getName()));
                                    } else if (field.getType() == Long.class) {
                                        field.set(t, rs.getLong(field.getName()));
                                    } else if (field.getType() == String.class) {
                                        field.set(t, rs.getString(field.getName()));
                                    }
                                }
                            } catch (IllegalAccessException | SQLException e) {
                                e.printStackTrace();
                            }
                        }
                );
                retList.add(t);
            }

            // 연결 종료
            statement.close();
            connection.close();
        } catch (Exception e) {
            // error handling
            e.printStackTrace();
        } finally {
            // 자원 반환
            try {
                if (statement != null) statement.close();
            } catch (SQLException e) {
                e.printStackTrace();
            }
            try {
                if (connection != null) connection.close();
            } catch (SQLException e) {
                e.printStackTrace();
            }
        }
        return retList;
    }

    public boolean create(T t) {
        Connection connection = null;
        Statement statement = null;
        boolean isSuccessful = true;

        try {
            // 입력받은 제너릭 클래스 생성
            Class<?> clss = t.getClass();
            Field[] declaredFields = clss.getDeclaredFields();

            StringBuffer sb = new StringBuffer();
            sb.append("INSERT INTO ").append(clss.getSimpleName()).append(" (");


            Arrays.stream(declaredFields).forEach(field -> {
                    if (field.isAnnotationPresent(CustomColumn.class)) {
                        field.setAccessible(true);
                        sb.append(field.getName()).append(",");
                    }
            });

            if (sb.charAt(sb.length() - 1) == ',') {
                sb.setLength(sb.length() - 1);
            }

            sb.append(")");

            sb.append(" VALUES (");

            Arrays.stream(declaredFields).forEach(field -> {
                try {
                    if (field.isAnnotationPresent(CustomId.class)) {
                        // PK는 넘김
                    }
                    else if (field.isAnnotationPresent(CustomColumn.class)) {
                        field.setAccessible(true);
                        sb.append("'").append(field.get(t)).append("'").append(",");
                    }
                } catch (IllegalAccessException e) {
                    e.printStackTrace();
                }
            });

            if (sb.charAt(sb.length() - 1) == ',') {
                sb.setLength(sb.length() - 1);
            }

            sb.append(");");


            System.out.println(sb);
            // JDBC Driver 등록
            Class.forName(JDBC_DRIVER);

            // DB 연결 생성
            connection = DriverManager.getConnection(DB_URL, DB_ID, DB_PWD);

            // Query 실행
            statement = connection.createStatement();
            statement.executeUpdate(sb.toString());

            // 연결 종료
            statement.close();
            connection.close();
        } catch (Exception e) {
            // error handling
            e.printStackTrace();
            isSuccessful = false;
        } finally {
            // 자원 반환
            try {
                if (statement != null) statement.close();
            } catch (SQLException e) {
                e.printStackTrace();
            }
            try {
                if (connection != null) connection.close();
            } catch (SQLException e) {
                e.printStackTrace();
            }
        }
        return isSuccessful;
    }
}
포스트맨으로 실행해보았습니다
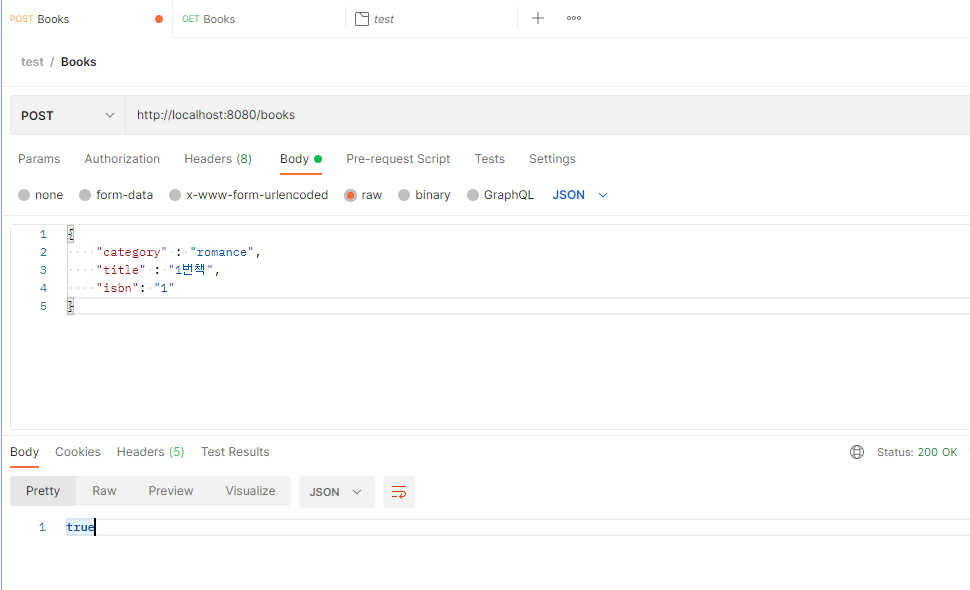
http://localhost:8080/books
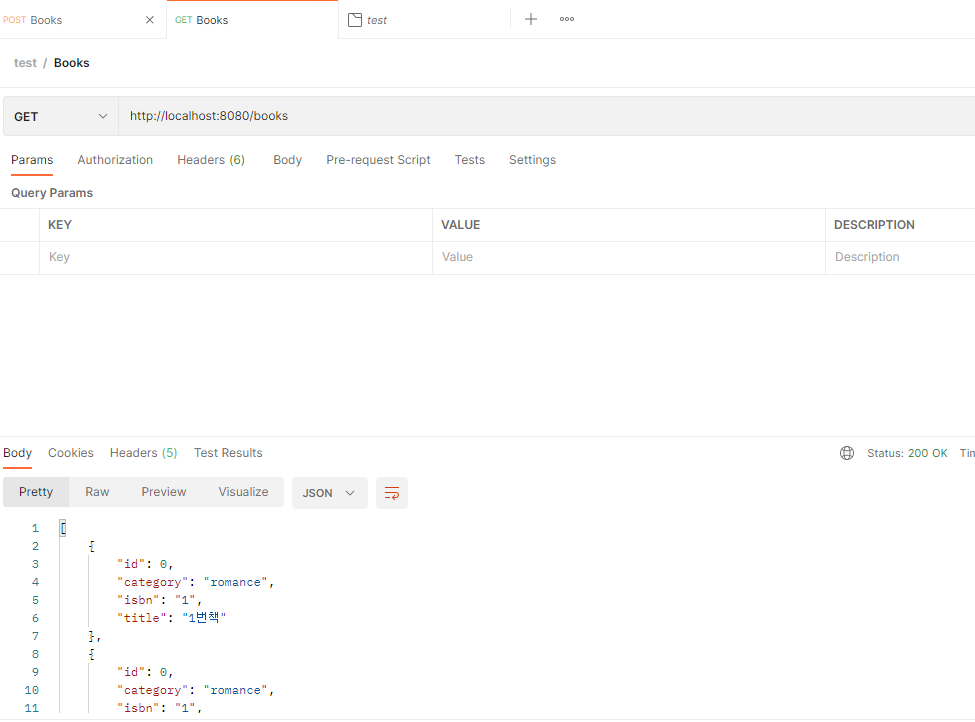
http://localhost:8080/books
id 값을 제거해줄 수도 있지만 시간 관계상 개념적인 부분을 다루었기 때문에
따로 추가하지는 않았습니다.
결론
저는 실무에서 JPA를 씁니다.
ORM을 직접 만든다는 건 수많은 에러 처리와 함께
방대한 내용을 다뤄야 하기에
어노테이션 기반으로 커스텀 칼럼과 PK 값들을 넣어서 확인해보는 간단한 ORM은
실무에 쓰기에는 부족한 점도 많습니다.
하지만 제가 위의 예제를 만든 이유는
지금 쓰는 JPA를 조금 더 이해해보고자 하는 이유 때문입니다.
한번 위의 코드를 따라서 뭔가 만들어 보셔서 가치를 창출하고
뭔가 배워가셨기를 바라며
이만 글을 마치겠습니다.
위의 코드는 깃허브에 있습니다.
https://github.com/songk1992/spring-examples
GitHub - songk1992/spring-examples
Contribute to songk1992/spring-examples development by creating an account on GitHub.
github.com
참조 및 인용
https://en.wikipedia.org/wiki/Object%E2%80%93relational_mapping
Object–relational mapping - Wikipedia
Programming technique Object–relational mapping (ORM, O/RM, and O/R mapping tool) in computer science is a programming technique for converting data between type systems using object-oriented programming languages. This creates, in effect, a "virtual obj
en.wikipedia.org
https://spring.io/projects/spring-data-jpa
Spring Data JPA
Spring Data JPA, part of the larger Spring Data family, makes it easy to easily implement JPA based repositories. This module deals with enhanced support for JPA based data access layers. It makes it easier to build Spring-powered applications that use dat
spring.io
https://docs.oracle.com/javase/8/docs/technotes/guides/jdbc/
Java JDBC API
Java JDBC API The Java Database Connectivity (JDBC) API provides universal data access from the Java programming language. Using the JDBC API, you can access virtually any data source, from relational databases to spreadsheets and flat files. JDBC technolo
docs.oracle.com
블로그 추천 포스트
https://codemasterkimc.tistory.com/50
300년차 개발자의 좋은 코드 5계명 (Clean Code)
이번 글을 통해 배워갈 내용 좋은 코드(Clean Code)를 작성하기 위해 개발자로서 생각해볼 5가지 요소를 알아보겠습니다. 개요 좋은 코드란 무엇일까요? 저는 자원이 한정적인 컴퓨터 세상에서 좋
codemasterkimc.tistory.com
오늘도 즐거운 코딩 하시길 바랍니다 ~ :)