이번 글을 통해 배워갈 내용
- Styled component key frame animation
- Styled component
- 리액트 카메라 촬영 기능
을 사용한 카메라 Component
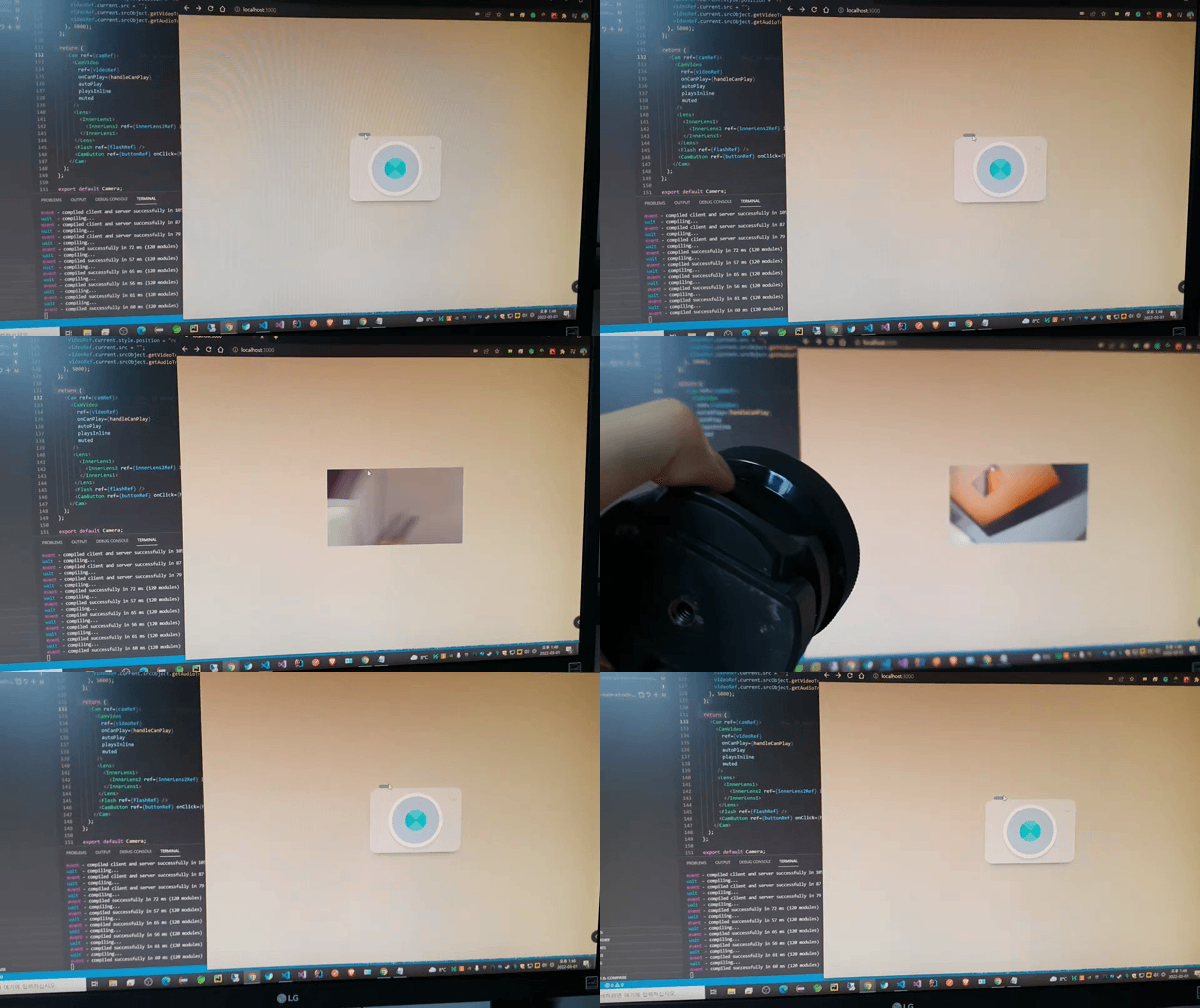
리액트로 카메라 CSS를 만들고
거기에다가 실제 카메라를 연동해서
NextJS로 돌려봤습니다.
회사 끝나고 밤 10시부터 새벽 2시까지 혼자 만들어봤는데
뭔가 만들고 나니까 뿌듯하네요
리액트로 스타일 컴포넌트를 제외한 외부 라이브러리 안 쓰고 카메라 컴포넌트를 만드니까
뭔가 라이브러리 없이도 이것저것 자유롭게 만든다는게 라이브러리를 쓰는 것보다 더 즐거운 것 같습니다.
아래 내용을 한번 읽어보시고
도움이 되길 바라며
즐코(즐거운 코딩) 하시길 바랍니다


카메라 안에 카메라 비디오 렌즈 내부 렌즈 플래시 버튼을 넣어주고
    <Cam ref={camRef}>
      <CamVideo
        ref={videoRef}
        onCanPlay={handleCanPlay}
        autoPlay
        playsInline
        muted
      />
      <Lens>
        <InnerLens1>
          <InnerLens2 ref={innerLens2Ref} isFlashing={isFlashing} />
        </InnerLens1>
      </Lens>
      <Flash ref={flashRef} />
      <CamButton ref={buttonRef} onClick={handleClick} />
</Cam>CSS를 꾸미고
useState를 이용해 버튼 클릭 시 나오는 애니메이션 연결해주고
useRef를 이용해서 컴포넌트를 조작해주고
getUserMedia를 사용해서
카메라와 연결해서
카메라의 기능을 활용하였습니다.
navigator.mediaDevices
      .getUserMedia({ audio: true, video: true })
카메라 컴포넌트의 전체 코드는 다음과 같습니다.
import { React, useRef, useState } from "react";
import styled, { keyframes, css } from "styled-components";

const lensAnimation = keyframes`
0% {transform : rotate(0deg) scale(1)}
40% {transform : rotate(90deg) scale(2)}
60% {transform : rotate(180deg) scale(3)}
80% {transform : rotate(270deg) scale(2)}
100% {transform : rotate(360deg) scale(1)}
`;

const innerLens2Animation = css`
  animation: ${lensAnimation} 2s linear forwards;
`;

const Cam = styled.div`
  width: 270px;
  height: 190px;
  background-color: #d5d4d5;
  border-radius: 10%;
  box-shadow: 0px 10px 20px -15px black;
  position: relative;
  display: flex;
  justify-content: center;
  align-items: center;
`;

const Lens = styled.div`
  width: 160px;
  height: 160px;
  background-color: #f6f6f6;
  display: flex;
  justify-content: center;
  align-items: center;
  box-shadow: 0 8px 0 0 #c1c1c1;
  border-radius: 50%;
`;

const InnerLens1 = styled.div`
  width: 140px;
  height: 140px;
  background-color: #a4c4e6;
  position: absolute;
  display: flex;
  justify-content: center;
  align-items: center;
  border-radius: 50%;
`;

const InnerLens2 = styled.div`
  border-top: 31px solid #57d0e6;
  border-right: 31px solid #0ad0e6;
  border-left: 31px solid #18bfde;
  border-bottom: 31px solid #5dd0e6;
  border-radius: 50%;
  ${(props) => (props.isFlashing ? innerLens2Animation : `animation: none`)};
`;

const Flash = styled.div`
  position: absolute;
  width: 20px;
  height: 20px;
  border-radius: 50%;
  background-color: #f5f5f5;
  box-shadow: 0 4px 0 0 #c0c0c0;
  right: 15px;
  top: 15px;
`;

const CamButton = styled.div`
  position: absolute;
  width: 36px;
  height: 10px;
  top: -10px;
  left: 25px;
  border-radius: 5px;
  background-color: #7d8fa3;
`;

const CamVideo = styled.video`
  position: absolute;
  width: 400px;
  height: 400px;
`;

const Camera = () => {
  const camRef = useRef(null);
  const innerLens2Ref = useRef(null);
  const flashRef = useRef(null);
  const buttonRef = useRef(null);
  const videoRef = useRef(null);

  const [isFlashing, setIsFlashing] = useState(false);

  const handleCanPlay = () => {
    videoRef.current.play();
  };

  const handleClick = async () => {
    navigator.mediaDevices
      .getUserMedia({ audio: true, video: true })
      .then((mediaStream) => {
        videoRef.current.srcObject = mediaStream;
        videoRef.current.onloadedmetadata = function (e) {
          videoRef.current.play();
        };
      });
    setIsFlashing(true);
    flashRef.current.style.background = "#E6DB4C";
    buttonRef.current.style.top = "-8px";
    await setTimeout(() => {
      flashRef.current.style.background = "#D6D6D6";
      buttonRef.current.style.top = "-10px";
      videoRef.current.style.display = "block";
      videoRef.current.style.position = "absolute";
      videoRef.current.style.zIndex = "30";
    }, 700);
    await setTimeout(() => {
      setIsFlashing(false);
      videoRef.current.pause();
      videoRef.current.style.display = "none";
      videoRef.current.style.position = "relative";
      videoRef.current.src = "";
      videoRef.current.srcObject.getVideoTracks()[0].stop();
      videoRef.current.srcObject.getAudioTracks()[0].stop();
    }, 5000);
  };

  return (
    <Cam ref={camRef}>
      <CamVideo
        ref={videoRef}
        onCanPlay={handleCanPlay}
        autoPlay
        playsInline
        muted
      />
      <Lens>
        <InnerLens1>
          <InnerLens2 ref={innerLens2Ref} isFlashing={isFlashing} />
        </InnerLens1>
      </Lens>
      <Flash ref={flashRef} />
      <CamButton ref={buttonRef} onClick={handleClick} />
    </Cam>
  );
};

export default Camera;
참조
https://developer.mozilla.org/en-US/docs/Web/API/MediaDevices/getUserMedia
MediaDevices.getUserMedia() - Web APIs | MDN
The MediaDevices.getUserMedia() method prompts the user for permission to use a media input which produces a MediaStream with tracks containing the requested types of media.
developer.mozilla.org
https://codemasterkimc.tistory.com/50
300년차 개발자의 좋은 코드 5계명 (Clean Code)
이번 글을 통해 배워갈 내용 좋은 코드(Clean Code)를 작성하기 위해 개발자로서 생각해볼 5가지 요소를 알아보겠습니다. 개요 좋은 코드란 무엇일까요? 저는 자원이 한정적인 컴퓨터 세상에서 좋
codemasterkimc.tistory.com
'Javascript > React' 카테고리의 다른 글
| 리액트 SVG로 손글씨 그림그리기 효과 구현해보는 한가지 방법 (0) | 2022.03.12 |
|---|---|
| 리액트 훅으로 생성자 구현해보는 1가지 방법 (0) | 2022.03.06 |
| 리액트 훅을 사용해서 캔버스에 움직이는 하트 애니메이션 만들기 (0) | 2022.02.25 |
| VS코드 리액트 개발의 필수 아이템 Simple React Snippets (0) | 2021.08.20 |
| 리액트로 틱택토 게임 만들면서 기초 배우기 # 9 (승자 정하기) (0) | 2021.08.07 |
